Why Immersion Brewing Deserves a Spot on Your Shelf
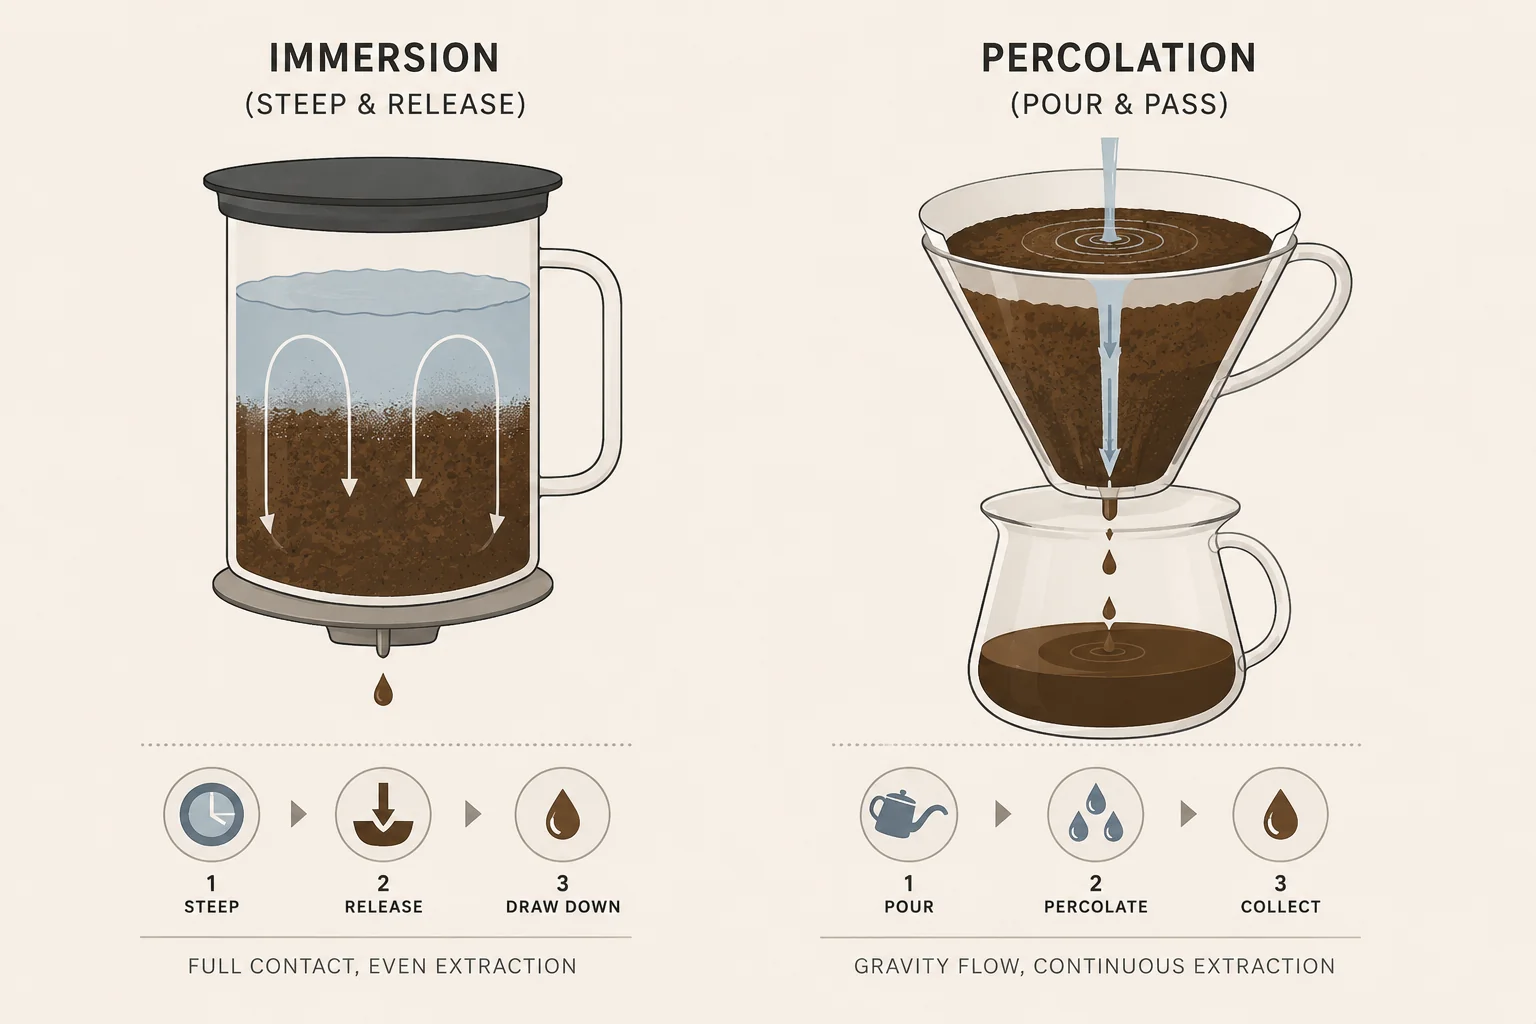
If you have ever felt betrayed by a pour-over that tasted brilliant one morning and thin the next, immersion brewing is the antidote. Instead of streaming water continuously through the coffee bed the way a V60 does, immersion fully submerges the grounds in water for a set time, then drains everything at once. That single difference changes the entire character of the brew.
The mechanism matters because it stabilizes contact time. In percolation methods, your pour speed, your pour height, and even how you swirl all influence how long water touches the coffee. In immersion, the clock does most of the work for you. Once the grounds are steeping, a wobbly pour or a phone notification mid-brew will not ruin the cup.
Immersion is forgiving by design. The water is already where it needs to be, so consistency comes from time and ratio rather than technique.
This makes immersion one of the most beginner-friendly families of brewing, while still offering enough control to satisfy people chasing high TDS clarity. Let us walk through the main tools and how to get the best out of each.
The Clever Dripper: Clean Cups Without the Anxiety
The Clever Dripper looks like an ordinary flat-bottom dripper, but it hides a silicone valve on the bottom. The valve stays closed while the coffee steeps, then opens automatically when you set the brewer on top of your cup or carafe. You steep, you release, you walk away. It is hard to overstate how relaxing this is.
Because the Clever uses a paper filter, it delivers the cleanliness of a pour-over with the body and sweetness of full immersion. In most cases it produces a rounder, sweeter cup than a comparable V60 recipe, since the longer stable steep tends to extract sugars evenly.
A reliable starting point for the Clever:
- Ratio: around 1:16 (for example, 18g coffee to 290g water)
- Grind: medium, similar to what you would use for a flat-bottom pour-over
- Water temperature: roughly 90 to 94°C
- Steep time: about 2 to 3 minutes before opening the valve
Actionable tip: Give the slurry a gentle stir or swirl right after the bloom, then leave it completely alone. Agitating once is usually enough to wet all the grounds. Stirring repeatedly tends to push fines into the filter and slow your drawdown.
The Hario Switch: Immersion and Percolation in One
The Hario Switch is essentially a V60 with a switch valve at the base, and it is the most flexible tool in this lineup. Closed, it behaves like an immersion brewer. Open, it drains like a normal V60. By toggling the switch mid-brew, you can build hybrid recipes that capture the body of immersion and the brightness of percolation.
A simple hybrid approach that works well for many coffees:
- Close the switch and pour your bloom water, around twice the weight of the coffee, then wait 30 to 45 seconds.
- Pour the rest of your water in one or two additions and let everything steep with the switch closed for about a minute.
- Open the switch and let it drain freely.
Because the Switch uses the conical V60 geometry, grind a touch finer than you would for the flat-bottom Clever, closer to a standard V60 grind. Water around 92 to 96°C tends to suit lighter roasts here. Tetsu Kasuya and Scott Rao have both popularized switch-style hybrid methods, and the takeaway is the same: the valve lets you decide how much percolation flavor you want.
The AeroPress: Pressure, Speed, and Endless Experiments
The AeroPress adds a variable the others do not have, which is gentle pressure from the plunger. You steep the coffee in the chamber, then press it through a filter into your cup. The whole process is fast, often under two minutes, and the small format makes it ideal for travel and single servings.
Because you control the steep time, grind, and press speed independently, the AeroPress invites tinkering. A common rule of thumb is to use a slightly finer grind with shorter steeps, or a coarser grind with longer steeps. Water from about 80 to 92°C gives you room to tame acidity in lighter roasts or pull more body from darker ones.
Actionable tip: Press slowly and stop the moment you hear a hiss. Pushing hard past the hiss forces air through the bed and can drag bitterness into the cup.
Going Iced: Brew Strong Over Ice
Immersion methods shine for iced coffee using the Japanese-style flash-chill concept. Instead of brewing hot coffee and pouring it over ice later, you brew a concentrated batch directly onto ice so it chills instantly. The rapid cooling locks in aromatics that slow cooling tends to dull.
The trick is accounting for the melting ice as part of your total water. A common starting framework is to replace roughly a third to 40 percent of your brew water with ice in the carafe, then brew the remaining water hot over the grounds. For example, if your recipe calls for 250g of water, you might put 90g as ice in the vessel and brew with 160g of hot water.
The Clever and the Switch both handle flash-chill gracefully because you can drain hot concentrate straight onto the ice bed. Keep your grind and temperature close to your normal hot recipe, and simply rebalance the water-to-ice ratio.
Choosing Your Immersion Tool
There is no single winner here. The Clever rewards people who want a clean, sweet cup with almost no fuss. The Hario Switch suits tinkerers who want one brewer that covers both immersion and V60-style percolation. The AeroPress is the fast, portable, infinitely adjustable option. Whichever you reach for, the underlying promise stays the same: stable contact time, repeatable results, and a forgiving path to a cup you can trust morning after morning.